Happy Cinco de Mayo!
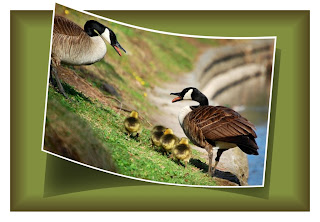
There are several techniques going on in this Photoshop tip for today. In honor of this special day I have included 5 techniques.
Can you guess how many have already been discussed in previous posts?
If you guessed 2 you would be correct.
#1 The green base was constructed using the same method as in "Fool-proof Frames and Mats" except that here I did not delete the center where the photo would usually go. I left the entire layer intact with the border edge giving it a little 3-D effect. The green base is one layer.
#2 The shadow under the curved photo was from the same technique show previously in "Simple Shadows" where we duplicate our subject to another layer and then blacken it and reduce the opacity to around 50%. In this photo, a little Gaussian Blur was added to the shadow to help feather the edges a touch. The shadow was then flipped vertically (Edit -Transform - Flip Vertically) and moved into a realistic position under the subject.
#3 The third element is adding a white border to the subject picture. To do this just take any photo and...
-Duplicate your layer as always,
-Press the letter "D" shortcut to set your color palette to black foreground/white background
-Go to IMAGE - CANVAS SIZE - (once here change your measuring scale from inches to pixels for both the height and width
-add 50 to 100 pixels equallyto whatever height and width values are shown (your preference on how much border you like to have)
-click OK and you're done. A nice white border around your pic!
(If it turns out your border is black, it's OK! Just grab a bucket of white paint and dump it on the border to change the color...it's easy to forget to change the color palette first)
#4 Bending things. An easy way to bend things is to go to FILTER - DISTORT - SHEAR
The downside is that it will only bend from left to right, not up and down. In that regard you may have been fooled by the Mother Goose photo shown here. Since SHEAR will only bend from left to right, in this case it was necessary to first ROTATE the canvas 90' clockwise before using the FILTER-DISTORT-SHEAR feature, and then rotate it back after completing the bend.
( The shear function is like curves in that it has a line you can bend and mold to all sorts of shapes which will then create the form for your image)
#5 Creative Composition. Remember that the awesome power of Photoshop lies in the layers. Create, compose, stack, blend, mix and match! Bring several techniques together.
One of the easiest ways to create quick compositions is by having Photoshop Tip Cards on your desk beside you. There are so many tips, techniques and cool things you can do...but only if you can remember them! If you have to go surfing the net to find tutorials every time, you're not going to be very productive.
Photoshop Tip Cards solve the problem! Index cards that sit quietly beside you, ready to help when you need inspiration, or just a subtle reminder when you can't seem to remember the crucial steps.
Get a FREE set today! Sign up to join our tip group!
And, if you'd like more detailed instructions on how to create bended, shadowed photos, just drop me an email request (subject line: Bending) to robert@totalfitnessphotography.com


No comments:
Post a Comment