Monday, June 29, 2009

Play with a Full Deck


Just a quick note to let you know...

The full deck of Photoshop Tip Cards in now complete!

Now, you too can become an instant Photoshop wiz!

Now, with your own set of Photoshop Tip Cards, you can plow through a pile of pre-printing processes in no time too!

Finally!

There is a simple, low-tech way to get help for the popular Adobe Photoshop editor.

STOP!
Wasting hours with distracting searches on the internet, flipping between screens looking for help as you're trying to work!

DROP!
The time wasting trial and error attempts to remember how to do all the complicated adjustments!

ROLL!
Your creative powers into making eye-catching digital images FAST!

Your house will be on FIRE!
With productivity and imagination.

52 easy to use index cards show in simple terms exactly how to do all the most popular Photoshop edits, tricks and "secret" shortcuts. And thanks to input from our members, printing costs have been substantially reduced. You're going to love (and be amazed at) the price!

Start playing with a full deck!
Get more details or order yours today at:

http://photoshoptipcards.com

Christie said it best...
"I love, love, love your tip cards!"
PhotographybyChristie.net

Yes...they were designed by me for YOU!
Made right here in Buffalo, NY USA!

"Like a Photoshop seminar in every box"
(Only I saved you the high-priced fees and took all the notes for you!)

Thursday, June 18, 2009

7 Profitable Photoshop Plans

Today I'm going to offer something a bit different.

Every once in a while you have to stop and think, "What's the point?"

Having all these great Photoshop tips at hand is a wonderful thing. But many of us are looking for ways to earn more money in photography. Luckily, the two go hand-in-hand.

You can use everything you learn in Photoshop to begin earning more money from your photography.

Here are 7 tips to get you thinking:

1. Add creative borders to your prints.
There is a reason people put thier most important photos into frames with mattes. It's because they look better! And naturally things that look better can sell for more. Fortunately, adding creative frames in Photoshop is not difficult (I've shown that in a previous post) and best of all it costs us nothing but a few moments of our time.

2. Adjust your exposures, sharpness and contrast
This is a bit basic, most of my readers will already be using Photoshop for post-production touch-ups on their photos. But for newbies, I can't think of one professional photographer, no matter how expensive his camera or how great his skill, that isn't using Photoshop or a similar editing software to create just a little bit better photo to sell his/her client.

3. Add Special Effects
How about adding a little vignette (soft border effect) to your photos? Maybe a little background blurr to make your subject stand out? Some shading? Text perhaps? A little color alteration or maybe add a few morew clouds in the sky? Maybe straighten the horizon. Maybe you want everything to be in black and white except some special feature? These can all help you collect more bucks for your pics with no expense but your time.


4. Cut and Paste your subjects into cute scenes
One of the most powerful features of Photoshop is that you can cut subjects from one scene and seemlessly paste them into another. Scott's NewPhotoBiz 1.0 is an amazing program for doing just that. Putting babies onto flowers, hugging fishbowls, and into washtubs can even allow you to make a great full time income from your photography. With all the different scenes and backgrounds available now, you charge for three or more scenes all from one photo! That's 3x the money!

5. Give your subjects "Extreme Makeovers"
With tools like the healing brush, gaussian blur and sharpness controls you can make skin tones flawless. No more pimples, moles, or scars! Tools like Liquify can turn frowns to smiles or make those big noses smaller. Even suck in those big guts making your subjects instantly look 10lbs. thinner. When you make your client look better than they ever imagined, you my friend are a true professional and will be rewarded accordingly.

6. Design your own business cards and flyers
I had struggled for years with other programs to create business cards and flyers. Boy was I surprised when someone flipped the switch in my brain by telling me that I could use Photoshop to to combine words and pictures (duh!). But until Scott from NewPhotoBiz 1.0 told me I never made the connection to creating business materials. With templates available from Vista Print and others, you can design your own custom materials and save a bundle.

7. Create unique custom greeting / holiday cards
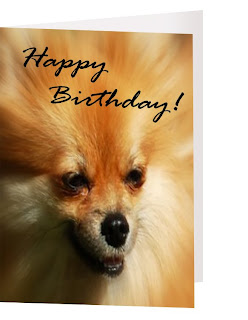
Your profits don't have to end with the photo session. Once your client gets his 5x7's, 8x10's and 16x20's you should be coming back to him often throughout the year with more things to sell him from your original works. Turn those photos into greeting cards like the one shown in todays photo. Thanksgiving and the Christmas holidays should your cue to get a custom card order out to your clients. Offer them postcards, keychains, coasters, tee shirts, golf balls, mugs, water bottles, blankets. None of this stuff has to be pre-ordered by you. There is no expense to you except to make the offer and there are many promotional site that make this easy. Cafepress
is just one site to look at for possibilities. Or start your own store!

Photoshop can be a powerful force that drives more profits into your business. For more ideas on getting the most from Photoshop and photography be sure to check out the other resources at the right on this page, in particular NewPhotoBiz 1.0.

Tuesday, June 9, 2009

Skin Softening with High Pass Filter

Wait a minute!

Didn't we recently do a post
using the
HIGH PASS FILTER
to SHARPEN?


Ah! Do the wonders of
Photoshop ever cease
to amaze?

Yes folks, for my next trick I will now attempt to show you how to soften skin using that high pass filter in another useful way.

Drum roll please...


First off, I had to delay this post for several days because I just couldn't seem to locate a photo that seemed appropriate. Kids and pets are my specialty and neither of them have much use for a skin softening, so I had no stock photos to share and demonstrate. In desperation, I dug deep to find the most appropriate thing I could, "The Princess and the Toad."

Those of you shooting adult portraits and especially teens, will be very happy to have this technique in your toolbox (or better yet in your tip card pack where you can find it!).

So here goes:

1. First up, use Ctrl-J to duplicate your background layer.
2. Change the BLEND mode to OVERLAY
3. FILTER - OTHER -HIGH PASS
You can play with the pixel size here. I found starting at 9.5 is good
4. Use the keyboard shortcut Ctrl-I to invert the layer
Next, dial down the opacity until the skin looks pretty good. Concentrate on the skin texture only, don't worry about fuzzy features like the lips, eyes, hair etc. Will bring 'em back next!
5. Add a LAYER MASK, and paint with BLACK over the detail areas like the eyes, lips, hair, etc. (removing the filter, like an eraser) and watch them return to their original sharpness. You can vary the brush size, type and opacity to fine tune.

So there you have it. The act is complete. All I ask is that you hold your applause and just throw money!

But seriously, if you like what you see here and want more, please sign up for our FREE TIP CARDS if you haven't already, or do click here to request additional packs (of 10 cards ea.) to get the full benefit if you are already a member. We're well on our way to the goal of 52 cards in the full deck now! I'll have a special bonus for anyone holding more than the original10 cards when I get the full deck completed. (You won't want to be caught by surprise holding a short hand!)

Tuesday, June 2, 2009

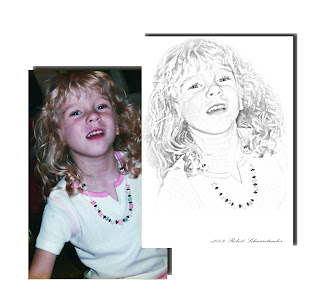
Photos to Sketch Drawing


After posting the previous lesson on converting color photos to pencil line art, many of you wrote asking for something better suited to portraits.

Your wish is my command!

Here is the simplest method I have ever found:

Duplicate your image using keyboard shortcut Ctrl-J
or you could also use Layer - New - Layer via copy

Next, desaturate (turn to B/W) the new Layer 1 using
Image - Adjustments - Desaturate

Duplicate Layer 1

On the new Layer 2 go to:
Image - Adjustments - Invert
now your photo should look like a negative

Now change the Blend Mode to Color Dodge
Whoops! Your photo just went all white...
well, that's all right.

We're going to now use the magic to give new life
to your photo...it will now be re-born in sketch form.

Ready?

Apply Filter - Blur - Gaussian Blur

BINGO! The magic sketch appears.
Now wasn't that simple and fun?

For best results, move your slider full left then bring back up until you get the best effect. You can also experiment using motion blur or radial blur in place of gaussian.

Finish up, if need be, by getting rid of any stray looking areas. To get the job done use the eraser tool, paint over with a white brush, or use a layer mask technique, whichever you prefer.

Remember, there's nothing like having all these tips right at your fingertips.

Why interrupt your workflow trying to find some technique you saw once before?

Sign up today (at the top right) to join our Photoshop Tip Card group. You'll get a free set of cards to keep by your computer. Then, within seconds you can be putting great tips like these to use...without having to waste hours searching online!

Sometimes, low-tech is better.
Sign up for your FREE Photoshop Tip Cards today!