Tuesday, September 22, 2009

3 Second Fix for Layers

In the previous post I promised to give you a quick, 3 second fix for changing layers that you drag over to create a composite photo.

Take this photo...please! :)

This was composed of many separate base layers: the 1.dog, 2.the cat, 3.the bird, 4.the sunset over lake background, (one of Scott's, NewPhotoBiz backgrounds) 5.the waves, 6.transparent inner frame, 7.black inner mat...and more.

Getting all those layers to match in terms of color, lighting, texture, etc. can often be a hassle. But with this quick and easy way to adjust one layer, without effecting all the others, your work will be much simpler.

Like most things Photoshop, there are many, many paths one may take to reach the desired end result.

But here is my quick, 3 second fix for layers that that just don't fit. Fit well with the other layers that is.

Rather than do something destructive to the layers you drag in, one of the simplest ways to alter just one layer in your composite starts with duplicating the layer (shortcut, hold down "Ctrl" key plus the letter "J" or Ctrl-J)

Then, change the blend mode on your new, duplicated layer from "Normal" to say, "Overlay" or "Softlight" From there adjust the Opacity of that layer to lighten or darken your subject on just that layer. That's a really quick way to lighten or darken your dragged-in subject to match the surrounding scene -without effecting any of the other layers.

Of course you can also use any of the other layer adjustments too. Filters, lighting styles, blur, you name it.

When you've got it looking just right, you have two options. Leave it just as it is, on two layers.
Or, if you can stand commitment, merge the two layers together. Merge IS advised if you feel you are going to be moving things around. Otherwise, it may be hard to get the original layer and the duplicate lined up later. Certainly, if you don't want to commit and merge them together, you could LINK them together so they move in tandem.

Sunday, September 20, 2009

Save Big Time with Cut-Outs

Unfortunately, we can't always get our subjects and our scenes in the same place at the same time.

Thankfully, we have Photoshop to fix that problem!

Case in point, my daughter's husky puppy looks just adorable with this sleigh (from NewPhotoBiz 1.0). Sitting in, rather than pulling it!

Originally, the puppy was photographed outdoors, in the backyard. The background was green grass and bushes.

The challenge was to remove said dog from the green grass to create a clean image that could be transferred to this sleigh scene.

If you've ever tried to cut fur from grass cleanly I know you're going to love this tip. A tip I got from Scott Voelker, creator of the NewPhotoBiz 1.0 program.

(Click On Photo Above for a Better View of Details)

Here it is...use the background eraser tool. The key is to set the parameters. Here's what I use:

Protect Foreground Color...check the box, this allows the eraser tool to cut out (delete, erase) anything that is not the color you select. In this case, I would use the eyedropper to click on an area of white fur to set the foreground color (protection). Sometimes, depending on your lighting and subject, you'll need to keep changing the foreground color you're protecting as you move around your subject. Like here when I cut around her pink tongue, I had to reset my foreground color to match her tongue, rather than her white fur. Then, once past, I returned the foreground color to white to protect her fur.

Tolerance. I set mine here at 50%. This tells PS how close to your foreground color it must protect. Since the fur color does vary a bit in white colors, but is very different from the green grass I want to erase, 50% worked well. However, if you're trying to cut out say a girls green dress from green grass, you might want to work with (set) a little less tolerance, say only a 10% tolerance (or variation) so PS doesn't confuse the grass with the dress and accidentally erase the dress too. Test, use "undo" to go back if you find it's erasing more than you want it to.

Limits. This will depend a lot on what you're working on. For fine detailed cutting in a photo where the colors vary greatly as in this puppy example, FIND EDGES will likely work best. If you have a lot of solid colors, perhaps Contiguous (connected) of Discontiguous (separated) might be faster for you

Sampling. In cutting out hair (or fur) I find that setting it to ONCE works best. Set it to the hair color and work around your subject.

Once you have your parameters set, chose a brush that works best for your situation, I usually start with a feathered brush, and start mouse-clicking that brush around the edges of your subject. If you've done it right, like magic it erases everything from around your subject, yet leaves even the finest hairs and whiskers! You might have to go around again to catch any stubborn areas, or use one of those spikey brushes to get into awkward areas.

Coming Next...Ever drag a subject from one photo into another and then wish you could change something about that layer. Maybe it's too light, too dark, not sharp enough. But you don't want to damage it, or go back to your original to fix it then move it back over?

Quick 3 second fix...next post!

Monday, September 7, 2009

Free Tips, Free Cards, Free-For-All!

Happy Labor Day!

I hope today finds you celebrating Labor Day by not doing much labor!

But instead, having FUN!

Today I want to help you do less work, Photoshop-wise, by giving you time-saving, work-saving tips.

Just a few short tips because I want time off too! And you don't want to spend all your time reading and trying to do difficult stuff today.

So here we go!

Text Tip #1... Normally when you click on the text icon (T), once you start typing a new layer is created. But if you're doing multiple text layers, often you start typing on an old layer where you didn't intend to.

Hold down the SHIFT key while you click on the T to guarantee you'll get a new text layer every time.

Text Tip #2... You often want to see several Font options before you select the one that's perfect for your project. The easiest way to do this is...

Type your text, highlight it, click in the FONT description box on the tool bar to highlight that, then just use the UP/DOWN arrow keys. As you scroll through it will automatically be changing your text.

Catchlights...Need a quick fix for giving life to those "dead" eyes that have no catchlight reflection? In the brush palette choose STAR 14 pixel. It actually looks like a slice of pie. Perfect for adding that sparkle to lifeless eyes.

Open a new layer, choose white for the color, size your brush then click to apply over the eye. Choose a layer blend mode that looks best, (overlay?) vary the opacity and viola! You've got eyes that dazzle!

OK, I promised to keep it short so you (and I) can go play.

But stay with me for this SPECIAL ANNOUNCEMENT!

I know following this Labor Day, many folks will have no job to go back to tomorrow. Layoffs are at astronomical levels. Many folks are wishing they had someway to restore the income they once enjoyed, someway to take care of their families, protect their homes and their health.

If you are one of those people, I have great news! Since you're here I'm guessing you must be familiar with Photoshop. And that leads me to believe you have a camera.

The great news is you need just one more thing (it's not expensive) to create your own Photography Business!

You need Scott Voelker's NewPhotoBiz 1.0

It has everything you need, all the tips, tricks and secret shortcuts for creating a PROFITABLE photography business...this week! Best of all you can download it and get started TODAY!

But it gets even better! To help you along even more, when you click the links on this page to read more and then order NewPhotoBiz 1.0 I'll send you a FREE deck of Photoshop Tip Cards!


Yes...a FREE deck of Photoshop Tip Cards, 52 cards packed with the best and most popular Photoshop edits, tips, tricks and secret shorcuts. I want you to have every advantage as you claim your independence and begin to restore your finances. I want to help you grow your own business so you never again have to depend on some company or boss to toss you crumbs.

Labor for yourself now! Labor for your family! Labor at something that's FUN!

Create beautiful portraits of children and pets in your community. With Scott's program, you'll have everything you need. Including his secret weapon forum described in the previous post.

Remember, to get your FREE card deck, (a $19.95 savings) you must order NewPhotoBiz 1.0 by following the links from this page. That's the only way for me to be notified of your purchase by Clickbank so that I can send you your FREE cards. Click here now to get started.

Sunday, September 6, 2009

Get Paid to Play with Photoshop

It's so much fun creating images, we could just sit for hours and doodle away with our Photoshop tools.

(read in this article for a link to some cool water effects you can play with for free!)

But just imaging how great it would be if we could GET PAID to just sit for hours and doodle away with our Photoshop tools?

Well, now you can!

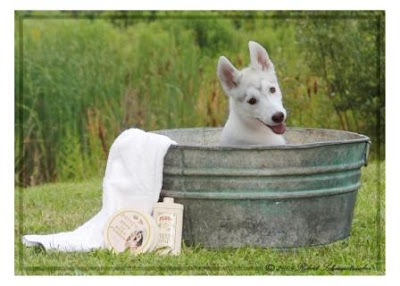
Actually, it's been almost a year now since Scott Voelker released the first product that makes it easy for ANYONE to create stunning images using Photoshop...and sell those images for BIG BUCKS...like the precious dog photo shown here.

I've mentioned his product many times before on my blog (one of the very few products I promote -because it's just so good). It's called NewPhotoBiz 1.0

It's more than just easy to use professional Photoshop templates that you can add your child and pet portraits into (saving yourself $1000's of dollars in props). Although that's a great way to seperate yourself from all the other photographers out there...and charge a lot more for your prints!

And it's more than a business-in-a-box (or now, a business-in-an- instant download!). Even though it contains a complete and proven system for new photographers to get customers.

Here's a little secret he doesn't tell you much about.

The number one thing stopping most amateur photographers from stepping up to the professional level and selling their photos for big profits, is FEAR.

Like most artistic types, we photographers are always asking, "Am I good enough?" "Is my photo really worth $1000?"

Well, not only does Scott give you the digital tools to be great, but his secret weapon is the forum he provides for those who purchase the NewPhotoBiz package.

And here's why that forum is worth far more than the modest cost of the NewPhotoBiz system.

Because it takes away the fear.

Wouldn't your confidence go through the roof if you could have professional photographers critique your images before you presented them to any customers?

And wouldn't your skills grow exponentially if those same professional photographers would offer you their years of experience, their tips, tricks and secret weapons for creating the best images ever, while never compromising your own unique style?

And wouldn't it be great if they did it for free? And how much better would it be if there were lots more "amateurs" there, just like you and you could watch and learn as they have their photos critiqued too? And you could get ideas about what the hot selling photos are. And you could get FREE marketing advice. Or you could just get someone to tell you you've created a really great photograph.

Now that's priceless.

While it's fine to sit and create fabulous images using Photoshop, I'll tell you from my own experience, it's much more fun to GET PAID to do it! When you get Scott Voelkers NewPhotoBiz you get everything you need to make that happen.

But even if you want nothing more than to create the most memorable images of your own children or pets, the modest cost of his program (which includes access to his secret weapon for vastly improving your photography skills...THE FORUM) Scott's program is easily worth 10 times what he charges. Because if you hired a photographer to create just one of the adorable images you can create with the NewPhotoBiz program, you'd easily pay him or her $1000 for just one big wall print.

When YOU get his program, you can create all the photos you want...at a fraction of that price!

Want to be a better photographer? Want to learn dozens and dozens of photography and Photoshop tips? Want to get professional critiques of your work?

Want to know if you're actually good...and how good?

Get the NewPhotoBiz program now and see for yourself... just click here!

Here's just one sample of the great information available when you participate.
It's a link I got from the forum moderator (for FREE!) along with a critique of one of my photos...it has really cool water effects you can add as filters in your Photoshop program.

http://www.flamingpear.com/flood.html

My best Photoshop tip for today is: Get someone to pay you to play!
And that's what you get (and more!) with Scott's NewPhotoBiz 1.0

Saturday, September 5, 2009

Cheapest Ring Light Ever!

While technically not a Photoshop tip, I am all about saving you time in your Photoshop edits. And it goes without saying that if you get the light right the first time you'll spend less time fixing it (or adding it) later in Photoshop.

Here in this diagram you'll see the amazingly simple and inexpensive ring light, made from 8 LEDs, that I used to photograph the strawberry in the color-change tip below.

All you need is a set of 10 LED lights that can be turned on continuously ($10+s/h) and a strip of adhesive velcro that wraps around your lens. ($3).

They provide an amazingly bright, even light that wraps around your subject. Really great for macro work. The tutorial said that the white balance might be weird, so I shot in RAW, but when I opened the files, I didn't need to make any color adjustments at all to compensate for the LED lights. (note: in the strawberry color change below, I did boost up the leaf color, yes, but that was because I already had bad color to begin with, not because of the LED light)

Here's a link to the cool website that showed me how to do it, and where to get the LEDs.
(another note: The website didn't say this but, the inexpensive LED supplier is in Honk Kong so, in my experience, it does about 10-14 days for delivery)

http://www.diyphotography.net/studio-at-home-introduction-to-led-lighting

Lots of other great tips there too...so take your time and browse around.

Consider adding these inexpensive LEDs to your camera bag. Used individually, as an additional spot light (highlighting the apple stem) or in groups like this ring light LEDs are
an inexpensive way to custom light your subjects. And so portable and lightweight too!

Let your imagination run wild!

And keep watching this week as I add more links to cool websites (other than my own!) where you can find great tips and inspiration. And more reasons to open up that Photoshop!

And don't forget to visit http://todaysphoto.org to view great scenes from photographers around the world...and get Rick's take on "The Original Photoshop Tip Cards".

Or for even more convenience, you can view TodaysPhoto.org right here at the bottom of this very blog page. Scroll down right now and check it out for your own self!

Easy Watermark Stamp

For maximum time savings it's important to automate as many repetitive actions as we can.

Watermarking, or copyright stamping our photos is one of those chores.

An easy way top automate this function is by creating a BRUSH that actually IS our watermark stamp.

Did you know you could create your own brushes? Not just for watermarking, but for painting or drawing or erasing with any shape you need and can create.

Basically, you use any of the text, shape or photo or drawing tools you wish, select any or all combinations with the marquee tool then choose EDIT-DEFINE BRUSH, choose a name for your creation and say "OK".

To begin, open Photoshop, go to FILE -NEW.
In the pop-up box be sure to check the box to make your background TRANSPARENT. (unless you want it with a white background, if so, then choose that option)

In this example for watermarking or copyright stamping photos, I chose the Copyright symbol from the shapes drawing icon, then added, on another later my name in Palace Script MT (strong).

I then merged the two layers together and used my rectangular MARQUEE tool to select everything together.

Once selected go to EDIT -DEFINE BRUSH. You'll get a pop-up box allowing you to name your new brush. Then, click "OK".

Now, whenever you want to apply a watermark to your photos, simply select your creation from the BRUSH pallete, (just like you would a round brush, but you'll have to scroll to the bottom of the list to find your new brush creation). Pick your brush color, and opacity, and flow then "CLICK" on your photo and like magic your signature stamp will appear.

Use the slider to adjust your signature size just like you would any other brush.

If you feel you want to tilt or make your selection vertical, simple create a new layer over your photo, stamp that with your brush then use EDIT-FREE TRANSFORM to position your brush or size it any way you like. If resizing this way, be sure to hold down the shift key as you resize to preserve the proportions.

Color Change -Quick and Easy 3 Step


Have you ever wanted to change the color of something in your photo, but not change the color of everything?

Here's some simple ways to do that and still maintain all highlights and other lighting characteristic of your subject.

In this example, the leaves needed a bit more color, but I certainly did not want to make everything greener!

First, select the area you wish to change using your favorite selection tool, ie. magic wand, lasso etc. However you do it, get those ants to dance around your selection.

Second, go to

LAYER-NEW ADJUSTMENT LAYER-HUE/SATURATION


...or, LAYER-NEW ADJUSTMENT LAYER-COLOR CHANGE

...or, LAYER-NEW ADJUSTMENT LAYER-SELECTIVE COLOR

Once you say "OK" to the pop-up box, the ants will disappear from around your selection but you will now have a masked layer (allowing changes to occur to only your selected subject).

Third...You may now begin to move the sliders until you achieve the color you wanted. You may also repeat the process (stacking layers), mix or match the color changing options, vary the opacity or lighting since each is on it's own separate adjustment layer.

Taking this a bit farther, you can see that by using the selection tool and LAYER-NEW ADJUSTMENT LAYER, you can selective change a zillion things about your selected subject (anything that comes up as an option under the NEW ADJUSTMENT LAYER).

Now that's a quick and easy 3 step!