Sometimes, amazing results can come from unexpected places.
In fact, going to blur might be considered exactly what we don't want to use when we want to bring out the "POP" factor in our photos. We most often associate the blur with softening, not "popping".
But there's a hidden a secret in this method!
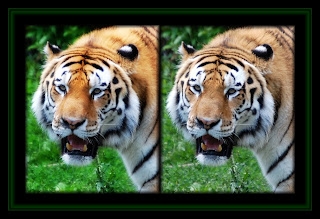
If you cannot already tell, in this tiger photo, the one on the left has been "popped!" while the one on the right is the original. You may click on the image to enlarge for greater detail - as is the case with all the photos seen in this blog.
Here is the simple technique revealed...
1. Open your photo and duplicate Ctrl-J (as always to preserve your original)
2. Go to FILTER - BLUR - GAUSSIAN BLUR and adjust the pixel radius so that you can still clearly see the shapes in your photo but still everything is sufficiently blurred. (in this popped photo the pixel radius was set to 15.8)
3. Here's the secret...change the blend mode on the layers pallet from NORMAL to OVERLAY!
Now is that simple or what! Try it out on your child and pet portraits, landscapes, everything!
Experiment! Instead of changing to OVERLAY, change to VIVID or HARD light. Vary the opacity.
ADVANCED: Want even greater control (as was used in this photo)? Then create a layer mask of the Gaussian blur and use the eraser to selectively apply the blur affect. In the case of the tiger, the darker regions of his face lost definition. Using the blur as a filter mask let me un-blur most of the face to preserve to detail but still create POP!
Gaussian blur to pop! It's in the cards for you.


No comments:
Post a Comment