Showing posts with label photographer. Show all posts

Saturday, May 29, 2010

Great New Photoshop Tips!

Well I apologize for not getting more great Photoshop Tips posted lately. But just because I didn't post, doesn't mean I wasn't thinking about you!

Truth is, so many of you who bought the Original Photoshop Tip Cards wrote in with suggestions on how they could be even better, I've spent the last month putting all your great suggestions to use. While y'all loved the tips, most of the changes you wanted centered around keeping the cards organized and easy to find when you needed them. While index cards have been in use for over 100 years, sometimes their "looseness" creates problems.

Great News!


Soon, you'll be hearing about the new, improved version of The Original Photoshop Tip Cards.

This new, improved format features 20% more material. It's jam-packed with easy to use new Photoshop tips to make creating stunning images faster and easier than ever.

Plus all your tips will stay in order in the new Plastic Comb Binder.

This new binding sytems along with a new table of contents assures you'll always find the exact tip you need when you need it. The comb binding also lets your cards lie perfectly flat while you work. Larger fonts let you easily read as you work. And, the flexible comb binding will let you add additional pages easily as they become available.

I'm just waiting on the printer now. If you're interested in getting your hands on this book, be sure to sign up at the right if you're not a member already. Joining is free and members are always the first to get the latest tips, updates, news and private special offers. So sign up today!

Stay tuned!

Sunday, September 6, 2009

Get Paid to Play with Photoshop

It's so much fun creating images, we could just sit for hours and doodle away with our Photoshop tools.

(read in this article for a link to some cool water effects you can play with for free!)

But just imaging how great it would be if we could GET PAID to just sit for hours and doodle away with our Photoshop tools?

Well, now you can!

Actually, it's been almost a year now since Scott Voelker released the first product that makes it easy for ANYONE to create stunning images using Photoshop...and sell those images for BIG BUCKS...like the precious dog photo shown here.

I've mentioned his product many times before on my blog (one of the very few products I promote -because it's just so good). It's called NewPhotoBiz 1.0

It's more than just easy to use professional Photoshop templates that you can add your child and pet portraits into (saving yourself $1000's of dollars in props). Although that's a great way to seperate yourself from all the other photographers out there...and charge a lot more for your prints!

And it's more than a business-in-a-box (or now, a business-in-an- instant download!). Even though it contains a complete and proven system for new photographers to get customers.

Here's a little secret he doesn't tell you much about.

The number one thing stopping most amateur photographers from stepping up to the professional level and selling their photos for big profits, is FEAR.

Like most artistic types, we photographers are always asking, "Am I good enough?" "Is my photo really worth $1000?"

Well, not only does Scott give you the digital tools to be great, but his secret weapon is the forum he provides for those who purchase the NewPhotoBiz package.

And here's why that forum is worth far more than the modest cost of the NewPhotoBiz system.

Because it takes away the fear.

Wouldn't your confidence go through the roof if you could have professional photographers critique your images before you presented them to any customers?

And wouldn't your skills grow exponentially if those same professional photographers would offer you their years of experience, their tips, tricks and secret weapons for creating the best images ever, while never compromising your own unique style?

And wouldn't it be great if they did it for free? And how much better would it be if there were lots more "amateurs" there, just like you and you could watch and learn as they have their photos critiqued too? And you could get ideas about what the hot selling photos are. And you could get FREE marketing advice. Or you could just get someone to tell you you've created a really great photograph.

Now that's priceless.

While it's fine to sit and create fabulous images using Photoshop, I'll tell you from my own experience, it's much more fun to GET PAID to do it! When you get Scott Voelkers NewPhotoBiz you get everything you need to make that happen.

But even if you want nothing more than to create the most memorable images of your own children or pets, the modest cost of his program (which includes access to his secret weapon for vastly improving your photography skills...THE FORUM) Scott's program is easily worth 10 times what he charges. Because if you hired a photographer to create just one of the adorable images you can create with the NewPhotoBiz program, you'd easily pay him or her $1000 for just one big wall print.

When YOU get his program, you can create all the photos you want...at a fraction of that price!

Want to be a better photographer? Want to learn dozens and dozens of photography and Photoshop tips? Want to get professional critiques of your work?

Want to know if you're actually good...and how good?

Get the NewPhotoBiz program now and see for yourself... just click here!

Here's just one sample of the great information available when you participate.
It's a link I got from the forum moderator (for FREE!) along with a critique of one of my photos...it has really cool water effects you can add as filters in your Photoshop program.

http://www.flamingpear.com/flood.html

My best Photoshop tip for today is: Get someone to pay you to play!
And that's what you get (and more!) with Scott's NewPhotoBiz 1.0

Tuesday, June 9, 2009

Skin Softening with High Pass Filter

Wait a minute!

Didn't we recently do a post
using the
HIGH PASS FILTER
to SHARPEN?


Ah! Do the wonders of
Photoshop ever cease
to amaze?

Yes folks, for my next trick I will now attempt to show you how to soften skin using that high pass filter in another useful way.

Drum roll please...


First off, I had to delay this post for several days because I just couldn't seem to locate a photo that seemed appropriate. Kids and pets are my specialty and neither of them have much use for a skin softening, so I had no stock photos to share and demonstrate. In desperation, I dug deep to find the most appropriate thing I could, "The Princess and the Toad."

Those of you shooting adult portraits and especially teens, will be very happy to have this technique in your toolbox (or better yet in your tip card pack where you can find it!).

So here goes:

1. First up, use Ctrl-J to duplicate your background layer.
2. Change the BLEND mode to OVERLAY
3. FILTER - OTHER -HIGH PASS
You can play with the pixel size here. I found starting at 9.5 is good
4. Use the keyboard shortcut Ctrl-I to invert the layer
Next, dial down the opacity until the skin looks pretty good. Concentrate on the skin texture only, don't worry about fuzzy features like the lips, eyes, hair etc. Will bring 'em back next!
5. Add a LAYER MASK, and paint with BLACK over the detail areas like the eyes, lips, hair, etc. (removing the filter, like an eraser) and watch them return to their original sharpness. You can vary the brush size, type and opacity to fine tune.

So there you have it. The act is complete. All I ask is that you hold your applause and just throw money!

But seriously, if you like what you see here and want more, please sign up for our FREE TIP CARDS if you haven't already, or do click here to request additional packs (of 10 cards ea.) to get the full benefit if you are already a member. We're well on our way to the goal of 52 cards in the full deck now! I'll have a special bonus for anyone holding more than the original10 cards when I get the full deck completed. (You won't want to be caught by surprise holding a short hand!)

Sunday, May 10, 2009

Shortcut Sundays...for Lazy Cats

"Look me in the eye(s) and tell me you don't want to get things done faster!"

I'm quite certain the cat's motto is, "Why do any more than you have to."

It is in that spirit that we continue on with another edition of Shortcut Sundays. Because why should we do more than we have to in Photoshop?

1. Quickly zoom to 100%: If you double-click on the zoom tool (looks like a magnifying glass, just above rt. to the color palettes) the magnification will go to 100%

2. Precise Cursor: When you engage the "Caps Lock" key the cursor switches to precise movement.

3. Background Color: by default, Photoshop brings up a grey background upon which to do our work.

Sometimes, because of the edge color on our photos, the default grey is not the optimum color to be working on. Or, maybe we just want to be seeing OUR favorite color in the background as we work. Well, making your default background any color you wish to is easy as 1-2-3:

1. Choose a color from the color palettes, have it in the foreground position.
2. Activate the Paint Bucket.
3. SHIFT-CLICK
anywhere outside of your workspace (not on your photo working area) and the background color will switch to whatever color you have chosen.

4. Quick-Change Brush Tool Opacity: To quickly set the opacity of your brushes, you can use the keyboard numbers (just above the letters, not off to the far-right on your keypad) (to increase by 10% increments). For example, once you have activated the brush tool,
PRESS the number 1 key to set brush opacity to 10%.
PRESS the number 2 key to set brush opacity to 20%
PRESS the number 3 key to set brush opacity to 30% ...
and so on , all the way up to pressing 0 to get 100%.

Well there you go! Another Shortcut Sunday Photoshop Session has ended. Go and piece to create another phabulous Photoshop phenomenon!

I'll be announcing a photo contest later this week, open to members of my Photoshop Tip Card Group only. Be sure to sign up today to join our group if you're not already a member. Then you'll be on the list to receive all the details too, and be eligible for valuable prizes. Current members can just sit tight...details will be coming to you soon.

Friday, May 8, 2009

Getting Customers, Keeping Them Happy


Today's Photoshop tip is a bit different, but equally valuable. I know it's valuable because it answers two of the most common questions photographers ask:

1. How can I get more customers, and...
2. Where can I find a reasonably priced lab that won't screw-up my prints.

After all, the motivation most of us have for bettering our Photoshop skills is $$!

When we're better we can charge more.
When we're better we can get more customers.
When we're charging more AND getting more customers, we're making more money!
And if we can find a good processing lab that saves us money and hassle...

Now we've got a GREAT BUSINESS!
And that's the connection today's tip has to Photoshop.

Actually it's two tips today. The two great resources you've been asking for:

First: How can you get more customers?

Veteran photographer and marketing expert Dan Eitriem has just released Volume 2 of his enormously successful book, "How to Pay the Rent With Your Camera...This Month!"

Volume 1 was packed with great tips on how to get more customers into your business at very little cost. But Dan's a great marketer and he knew there were even more ways photographers could get customers. So, once again, Dan approached photographer's, asking them to reveal their best customer getting tips. And sure enough, he got tips to fill an entire book... Volume 2 was born!

I've been a big fan of Dan's marketing genious for quite a while now. Bought just about all of his stuff and loved it...because it works! Dozens of proven ways to get customers, with little or no cost marketing methods...methods that "real people" can actually do. Even me!

Volume 1 was great, I bought it, I loved it. Volume 2 is just as good if not better.

And if you like my tips here, you might just enjoy (and profit from) the one tip of mine Dan thought was so good he even included it when putting together Volume 2 of "How to Pay the Rent With Your Camera...This Month!"

You'll find that tip on Page 32 of his book, and not anywhere else but in Dan's book. So yes, if you buy his book I'll get a small percentage from Clickbank, but you'll get so much more when you put even one of his 17+ methods to work!

So tip one is: Want more customers? Get Dan's book.

Second: Where Can I Get Great Prints at Great Prices?

You could spend hours and hours, using all your Photoshop skills to create the finest photos, but if your monitor calibration is off your prints are going to come back looking awful. Or if the kid down at the photo lab is just dumping your photo files in to print, you could get back garbage.

- Wouldn't it be nice to know that each and every one of your photo files was being looked at on a carefully calibrated monitor prior to printing?
- Wouldn't it be nice to know that if the color or exposure was a bit off trained technicians would adjust it prior to printing?
- And if you could get fast turn-around, fast deliver, and freindly folks to deal with would you be tempted to learn who's doing this?
- And if I told you their prices were better, in many cases, than anything you could get locally would you just about kill me if I wouldn't tell you who they were?

Not to worry! I'm here to help.
And if it makes you feel any better, I get nothing for telling you about them. We are not affiliated in any way - except that they do my prints and I am happy to pay them.

You can get more details about them from their website: http://meridianpro.com

Tip Two is: Great prints, great prices at http://meridianpro.com

Photoshop is a great tool for improving our end results. But if we can't get a good print, at a good price, and someone to sell it too...what's the point?

Tuesday, May 5, 2009

Faster Cut-Outs

One of the great features of Photoshop is that you can cut out parts of one photo and paste them into another.

(And you can make a lot of money doing it! I'll tell you how at the end of this post)

Or you can just cut your subject out to get rid of the background entirely, as was done in today's photo.

So we agree, cutting is good and useful.

But we might not always agree on the best way because there are so many options. Some harder than others.

1. We could use the eraser tool to slowly and carefully erase all around our subject, hoping we don't accidentally erase something we didn't want to. Not recommended for large areas.

2. We could use the lasso tool to select the edges of our subject by carefully guiding our mouse along the edges. A relatively imperfect task, made a bit easier when the magnetic lasso tool is employed.

3. We could use the magic wand to select our subject. But the magic wand selects based on similar color/tonality. But by holding the SHIFT key and left mouse clicking we could eventually select all the colors/tonalities within of our subject.

4. We could use the magic wand tool on our background. In the case of the photo shown here we would left mouse click in the black area around our subject. Because it is a uniform, solid color it will automatically avoid all of my subject. Then go to SELECT -INVERSE. Now instead of the background being selected, my image is. Now I can lift my lady out of the black by choosing LAYER-NEW LAYER-VIA COPY (or CUT if you prefer)

When your background is more uniform than your subject, selecting the background and then inverting your selection can be a faster, if less obvious, solution many times.

To be efficient, we ideally look for the fastest way. #4 is clearly the easiest and fastest way with this photo here.

It's easy to get confused, have tunnel vision when approaching a task. Doing things the usual way, the way we are comfortable isn't always the best way. A little time spent thinking about all the possibilities before diving in can often be time well spent.

Having your Photoshop Tip cards on your desk to flip through can give many time saving ideas.

Now if you want to make lots of money just cutting babies and pets out of photos and putting them into the cutest scenes, look in the right margin, or click here for Scott's, NewPhotoBiz 1.0

It's a great way to earn extra income, or even full time income using your camera. Best of all, it's recession proof! People love their pets in good economies and bad. And last I heard, they're still making babies all over the place!

Monday, May 4, 2009

5 Photoshop Tips for Cinco de Mayo


Happy Cinco de Mayo!

There are several techniques going on in this Photoshop tip for today. In honor of this special day I have included 5 techniques.

Can you guess how many have already been discussed in previous posts?

If you guessed 2 you would be correct.

#1 The green base was constructed using the same method as in "Fool-proof Frames and Mats" except that here I did not delete the center where the photo would usually go. I left the entire layer intact with the border edge giving it a little 3-D effect. The green base is one layer.

#2 The shadow under the curved photo was from the same technique show previously in "Simple Shadows" where we duplicate our subject to another layer and then blacken it and reduce the opacity to around 50%. In this photo, a little Gaussian Blur was added to the shadow to help feather the edges a touch. The shadow was then flipped vertically (Edit -Transform - Flip Vertically) and moved into a realistic position under the subject.

#3 The third element is adding a white border to the subject picture. To do this just take any photo and...

-Duplicate your layer as always,
-Press the letter "D" shortcut to set your color palette to black foreground/white background
-Go to IMAGE - CANVAS SIZE - (once here change your measuring scale from inches to pixels for both the height and width
-add 50 to 100 pixels equallyto whatever height and width values are shown (your preference on how much border you like to have)
-click OK and you're done. A nice white border around your pic!
(If it turns out your border is black, it's OK! Just grab a bucket of white paint and dump it on the border to change the color...it's easy to forget to change the color palette first)

#4 Bending things. An easy way to bend things is to go to FILTER - DISTORT - SHEAR
The downside is that it will only bend from left to right, not up and down. In that regard you may have been fooled by the Mother Goose photo shown here. Since SHEAR will only bend from left to right, in this case it was necessary to first ROTATE the canvas 90' clockwise before using the FILTER-DISTORT-SHEAR feature, and then rotate it back after completing the bend.
( The shear function is like curves in that it has a line you can bend and mold to all sorts of shapes which will then create the form for your image)

#5 Creative Composition. Remember that the awesome power of Photoshop lies in the layers. Create, compose, stack, blend, mix and match! Bring several techniques together.

One of the easiest ways to create quick compositions is by having Photoshop Tip Cards on your desk beside you. There are so many tips, techniques and cool things you can do...but only if you can remember them! If you have to go surfing the net to find tutorials every time, you're not going to be very productive.

Photoshop Tip Cards solve the problem! Index cards that sit quietly beside you, ready to help when you need inspiration, or just a subtle reminder when you can't seem to remember the crucial steps.

Get a FREE set today! Sign up to join our tip group!

And, if you'd like more detailed instructions on how to create bended, shadowed photos, just drop me an email request (subject line: Bending) to robert@totalfitnessphotography.com

Sunday, May 3, 2009

Shortcuts Answer Your Prayers for More Time

Welcome to another edition of Shortcut Sundays!

Today brings many more Photoshop keyboard shortcuts, shortcuts which can be the answer to your prayers for more time.

Each keyboard shortcut can often save 2, 3, or 4 clicks of the mouse, plus your time reading pop-up dialog boxes which may appear at each step.

While one shortcut may not seem like that much of a time-saver, over the course of an entire photo project they can really add up.

Maybe all of them won't be useful for you, but the repeated use of the ones most commonly used in your work will make your life easier...help you get back some of your precious time.

That being said, here are today's Shortcut Sunday tips:

X switches your foreground and background color palettes
B brings up the brush tool
T brings up the text tool
J brings up the healing tool
W brings up the wand tool

Ctrl -Tab when you're working from several photos at once, your desktop can get pretty messy. Using this shortcut lets you quickly switch between layers

Ctrl -Shift-N adds a new layer to your work and includes the dialog pop-up box

Ctrl - Shift - Alt -N adds a new layer to your work instantly, without the dialog pop-up appearing

That's it for today's Shortcut Sunday tips. Be sure to try them out immediately while fresh in your mind. Even if you don't think you'll use them, by trying them just once or twice you may find that you'll remember them at just the right time in the future when you need them.

And for the ultimate Photoshop memory tool...be sure to sign-up for the FREE Photoshop Tip cards. Then, when you're stumped and wasting time because you want to do something but can't remember how, you can simply leaf through the tip cards setting beside your computer to find the answer.

No Google searching! No flipping from site to site! No interrupting your workflow!

If you really want to get through your Photoshop edits in the fastest possible way, and learn new tip and tricks to add pizazz to your photos...get your self a FREE pack of Photoshop Tip Cards today. Sign-up today!

And for even more great resources to help build your photography skills and profits -be sure to check out the other links located along the right side of this page. Personally used by me and tested for value, you'll find excellent opportunities for growth in the resource links provided.

Friday, May 1, 2009

100 Percent Clear

Be like the tall building... reach for the sky!

Short post today (tonight). Got to rise early for my daughter's First Communion service tomorrow. And there's still miles to go before I sleep! So here we go...

Ever found yourself scratching your head as to why your photo will look nice and sharp at one percentage, say 25%, and then when you zoom up to 75% or 95% to do some detail work it gets all fuzzy, all pixelly, all jagged?

It's a Photoshop thing.

Photoshop uses its full pixel power at 100%, 50%, 25% and 12.5 %. At these percentages you will see what you'll get.

Intermediate percentages, those which fall between any of the numbers shown above, like 33.3% will not include all the pixels. That is why your image may appear a little fuzzy at that size, but then it looks good when you move to 50%.

Photoshop stores in cache the full pixel preview at the 100, 50, 25 and 12.5 percent ratios. By not showing/storing for every ratio, memory is conserved and speed is optimized.

So if your adjusting for clarity or sharpness, be sure your ratio is set to one of the 4 full-pixel points...100%, 50%, 25% or 12.5 %.

There you go. Another Photoshop mystery solved.

Remember to pop on back for "Shortcut Sunday" where I'll share more secret keyboard shortcuts to speed your work along.

And, be sure to sign-up (in the top right corner) for the Photoshop Tip Cards group.

In addition to receiving a FREE set of cards, next week I'll be announcing a new book that I've co-authored with another photographer who just happens to be a brilliant marketer. If you're looking to boost your income along with your Photoshop skills, you won't want to miss it!
Sign-up now so you'll be the first to know!

by Robert Schwarztrauber

Thursday, April 30, 2009

Photoshop Crop...Cutting for Clarity


The final entry in this series on my Photoshop workflow process is CROP.

If you've been following, you remember that I'm working backward from CURVES where it all started (or ends). I know it's a bit confusing so let me restate the workflow.

#1 Crop...#2 Levels...#3 Curves That's the process 99% of my photos go through before I do anything else in Photoshop. And today I'll discuss CROP and it's importance.

Above you'll see the before (left) and after (right) of my goose friend here.

One key element that makes for a good photographs is a clearly defined subject. One element in your photo that the eye is instantly drawn to. One clear focal point telling your eye exactly what to look at. Photos that have too many objects, arranged in random order, distract and confuse the eye which then tells the brain, "I don't like it."

So the function of cropping is two fold.

One is to cut out the distractions or excess items that draw the eye away from the main subject and two, to place the supporting object and main subject into a position on the photo that has been proven to please the eye.

Cutting out distractions using the CROP tool is really just zooming in. We attempt to create the smallest size picture that still shows the main subject of our photo (which we hopefully chose when we originally took the picture) and the least amount of supporting items that still tell the story. A good photo never leaves the viewing thinking, "What's that supposed to be a photo of?"

In the example of the goose above, you can see that I cropped (zoomed in) on her head and neck.

That's because the original scene had too much wasted space, too much that wasn't my subject- which of course, was the goose.

The second consideration when using the crop tool is placement, where is your subject located on the page. Imagine your photo is divided by three equally spaced lines, both horizontally and vertically. Ideally, you will want your subject to lie where a horizontal and vertical line intersect. (Red dots)
Dead center is usually not best. But rules are made to be broken, sometimes. On the diagram you can see why it's called the Rule of Thirds. Three lines up, three across. Put your subjects there.

And the last element of good composition ( and function of the CROP) tool is to get some diagonals working. That is aligning some elements of your photo to form a diagonal line which helps to draw the viewers eye into the scene, hopefully concluding at your subject.

Be careful when positioning faces. The viewers eye naturally seeks out other eyes, even if that's not where you want the viewer to look.

Going back to my crop example above, you can see that the beak (a bright orange, eye drawing color is on the lower left thirds line, and the other main feature is the goose's neck detail, also located on a thirds line (right/lower). The eye lies in between. You can see the diagonal line created by the gooses neck. And also a diagonal from (lower-left /up) created by the beak and eye combination.

So to recap, I used CROP to zoom in and feature the main subject. I used CROP to position the subject in the photo along the rule of thirds. Both considered Composition actions.

Also, consider what size you wish your final photo to be before you crop. You can define the size in the toolbar once you select the crop tool - standard sizes like 4x6, 5x7, 8x10, 10x14, 16x20.
Set your size before you crop, click and draw your crop lines on the photo. Photoshop will work from the dimensions you chose. If you change you mind, right click inside your box and left mouse click CANCEL to start over. Or left click CROP to keep. You can use the ENTER key to crop as well.
You can also click (CLEAR) on the toolbar and freeform any size rectangle you wish for cropping.

That concludes my series on workflow. I hope it was helpful.

Remember, CROP - LEVELS - CURVES. A great way to start your Photoshop day!

Also, if you've ever had a dream, pop over to:
totalfitnessphotography.com for what might just be the most inspirational story in our lifetime.
"I Have a Dream!"

Wednesday, April 29, 2009

LEVELS: Secret to Pin-point Accuracy

In the previous post on CURVES I made mention of my Photoshop workflow process. Many of you wrote asking me to describe my workflow so I thought I would do that today.

Since I described the third step in my process, CURVES, a bit already, today I'll work backward and describe a little tip on my second sequence in processing, LEVELS.

First, to give you the playbook, I always begin optimizing my photographs in Photoshop this 3 step way:

Ctrl-J to duplicate the background so I'm not working on my original. It's automatic to me, a must do, so I'm not even giving it a step number.

1. CROP: Here I compose the photo. Getting the subject where I want it and getting any clutter or distractions out of the picture. More on CROP tomorrow.

2. LEVELS: I use the histogram in LAYER - NEW ADJUSTMENT LAYER - LEVELS.
Today I'll give you a neat trick that lets you optimize your levels adjustment to retain all the pixels.

3. CURVES: After cropping to size and compose, after using LEVELS to set the proper exposure I next move to CURVES to give a little more sharpness and contrast to the photo. On rare occasions I will vary from this, but mostly my curves adjustment will look like this:
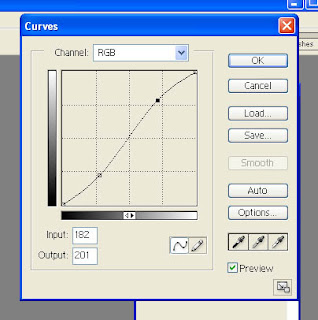


Using these three steps lets me very quickly improve the visual and technical qualities of 80% of my work. The other 20% will need some blemish repair, maybe a little more hue, maybe a little more sharpness, maybe a little Gaussian blur on the background to highlight my subject.

I don't include specialty stuff here, like subject transplants, or creative works like the statue in the previous 2 posts. And of course fun stuff like Scott's NewPhotoBiz 1.0 . But those project all still start out with my 3 step process. Crop, Levels, Curves.

OK, OK! Today's tip on LEVELS.

Often times when you open the levels window, you will see that histogram does not run complete from left to right (aka, dark to light). Maybe it doesn't reach to the dark side, which means you need to move the left slider arrow towards the middle to darken your photo. Maybe the histogram doesn't reach to the right side which means you need to drag the slider arrow toward the middle to lighten your photo.

But if you move it too far, you begin to let pixels drop off. You inadvertantly loose the lightest or darkest values. Sometimes, that's ok. But what if you want to keep everything?

Here's the tip!

Hold the (Alt) key down while you move the sliders.
Watch your photo now as you move the sliders.

If you are moving the right (lightest) slider arrow your photo will start out as black. As you move it left, towards the middle of the histogram to lighten your photo, you will begin to see a light appear from your subject. As soon as you see the first light, stop. That is the lightest pixel.

If you are moving the left (darkest) slider arrow your photo will start out white. As you move the arrow right, towards the middle of the histogram to darken your photo, you will begin to see colors appear. Stop. At that point you are revealing the darkest values in your photo.

There you have it. Now you know exactly where the lightest and darkest values lie on your photo. That's not to say it's bad to go past that point. It's OK to knock a few pixels off if it makes for a better photo in the end. But at least you won't inadvertently be losing them because you GUESSED where you should put the slider. now you can KNOW!

Be sure to sign up for my Tip Cards at the upper right of your screen. In addition to getting a FREE set of Photoshop Tip Cards for handy desktop reference, next week I'll be letting my Photoshop Tip Card Members in on a new book I co-authored with another very well known photographer and marketing expert.

In the book you'll discover great new ways to boost your photography income
(or even get yourself started in this great business with very little expense!)

Go ahead now...SIGN UP...it's free!

And tune in tomorrow for more CROP!

This is Robert Schwarztrauber, signing off to go Photoshop something.