 In the previous post on CURVES I made mention of my Photoshop workflow process. Many of you wrote asking me to describe my workflow so I thought I would do that today.
Since I described the third step in my process, CURVES, a bit already, today I'll work backward and describe a little tip on my second sequence in processing, LEVELS.
First, to give you the playbook, I always begin optimizing my photographs in Photoshop this 3 step way:
Ctrl-J to duplicate the background so I'm not working on my original. It's automatic to me, a must do, so I'm not even giving it a step number.
1. CROP: Here I compose the photo. Getting the subject where I want it and getting any clutter or distractions out of the picture. More on CROP tomorrow.
2. LEVELS: I use the histogram in LAYER - NEW ADJUSTMENT LAYER - LEVELS.
Today I'll give you a neat trick that lets you optimize your levels adjustment to retain all the pixels.
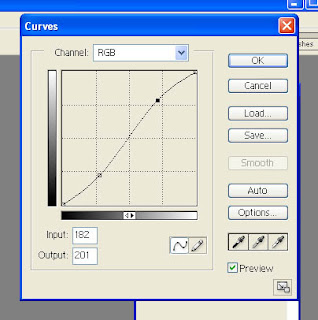
3. CURVES: After cropping to size and compose, after using LEVELS to set the proper exposure I next move to CURVES to give a little more sharpness and contrast to the photo. On rare occasions I will vary from this, but mostly my curves adjustment will look like this:

Using these three steps lets me very quickly improve the visual and technical qualities of 80% of my work. The other 20% will need some blemish repair, maybe a little more hue, maybe a little more sharpness, maybe a little Gaussian blur on the background to highlight my subject.
I don't include specialty stuff here, like subject transplants, or creative works like the statue in the previous 2 posts. And of course fun stuff like Scott's NewPhotoBiz 1.0 . But those project all still start out with my 3 step process. Crop, Levels, Curves.
OK, OK! Today's tip on LEVELS.
Often times when you open the levels window, you will see that histogram does not run complete from left to right (aka, dark to light). Maybe it doesn't reach to the dark side, which means you need to move the left slider arrow towards the middle to darken your photo. Maybe the histogram doesn't reach to the right side which means you need to drag the slider arrow toward the middle to lighten your photo.
But if you move it too far, you begin to let pixels drop off. You inadvertantly loose the lightest or darkest values. Sometimes, that's ok. But what if you want to keep everything?
Here's the tip!
Hold the (Alt) key down while you move the sliders.
Watch your photo now as you move the sliders.
If you are moving the right (lightest) slider arrow your photo will start out as black. As you move it left, towards the middle of the histogram to lighten your photo, you will begin to see a light appear from your subject. As soon as you see the first light, stop. That is the lightest pixel.
If you are moving the left (darkest) slider arrow your photo will start out white. As you move the arrow right, towards the middle of the histogram to darken your photo, you will begin to see colors appear. Stop. At that point you are revealing the darkest values in your photo.
There you have it. Now you know exactly where the lightest and darkest values lie on your photo. That's not to say it's bad to go past that point. It's OK to knock a few pixels off if it makes for a better photo in the end. But at least you won't inadvertently be losing them because you GUESSED where you should put the slider. now you can KNOW!
Be sure to sign up for my Tip Cards at the upper right of your screen. In addition to getting a FREE set of Photoshop Tip Cards for handy desktop reference, next week I'll be letting my Photoshop Tip Card Members in on a new book I co-authored with another very well known photographer and marketing expert.
In the book you'll discover great new ways to boost your photography income
(or even get yourself started in this great business with very little expense!)
Go ahead now...SIGN UP...it's free!
And tune in tomorrow for more CROP!
This is Robert Schwarztrauber, signing off to go Photoshop something.

No comments:
Post a Comment