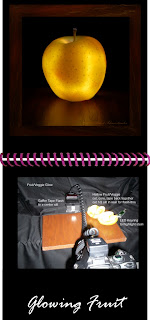
 Yes, that's right! Not growing, but GLOWing your own fruits and veggies.
This fun project can keep you busy for hours. It starts with a trip to the grocery store to buy your subject material.
Begin with the end in mind. What we are going to do is hollow-out our fruit or veggie and then send the flash through it to create the effect of glowing shown here in this golden apple photo.
Apples of all colors work well. Peppers, oranges, eggplant work well too.
Anything with a colorful quality, with a firm and translucent outer skin could be a candidate. It should also be close to or larger in size than your speedlight.
A helpful tip if you are doing apples is to buy a lemon as well.
Apples quickly start to turn brown as you cut out the middle in preparation for the photo, but if you coat the inside with lemon juice it will help keep the apple white much longer. ( if brown it tints your flash-thru in an unpleasing way)
Once home, examine your fruit for its "best side". Next, plan your attack.
The inner fruit must be removed, hollowed-out, to clear the way for the flash to shine through and give it that glow.
In the example here I just cut the fruit in half to begin coring, then used two small pieces of Scotch tape to put it back together for shooting. Next time, I'll not cut in half, but rather have my cut lines at 10 o'clock and 2'oclock on the rear side to better hide the lines from the front camera angle. You may need to touch up a little in Photoshop if your seam or tape can be seen.
You don't have to be perfectly hollow, you don't want to puncture the skin on the photo side.
Once you have both pieces hollowed, take the rear half and cut a rectangular slot (1/2"wide by 1" tall) at the position where your speedlight can shine through as both the apple and flash rest on the table. If you're shooting something like a pepper that is mostly hollow already, you can skip the steps above and just start here with the slit in rear.
Next, place two pieces of gaffers tape over your speedlight to limit the flash to just the inside of your subject. Duct tape will work too. Drape some black material behind your scene (a simple sheet will do) and the set your subject on the table with the speedlight directly behind it. Masked slit to fruit slit. A wireless triggered speedlight offers more flexibility of camera position, but shown here is a basic wired version with camera on tripod.
Next set your focus and take a shot. Tweak.
You can play with the flash amounts, zoom in, zoom out. Higher or lower angle. Compare different surface materials for how they reflect the glow. If you're shooting in mixed lighting consider using camera RAW to more easily adjust the lighting later. The shot shown here was under florescent, normal room lighting.
However, when doing the apple I noticed the stem wasn't getting enough light. So I just spot-lighted it with the LED of my keyring!
Experiment! Be creative! Have fun!
Be sure to click on the photo above to better view details of the set up.
While I don't discuss shot set-ups like this in my Photoshop Tip Cards, the cards sure come in handy for creating the highest quality images AFTER you take your best shot. Spend your time with the camera...not at the computer fixing later. Photoshop Tip Cards offer the fastest path to fine finished photos. Save time by getting your Photoshop Tip Card Deck today!


No comments:
Post a Comment