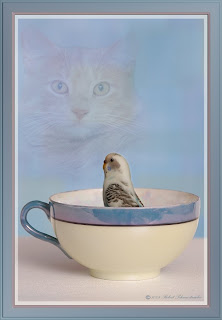
 After posting my parakeet/cat photo I was asked, "How'd you blend the cat into the background so well?"
I'll start by saying that I hate the eraser tool for all but the roughest cutouts. Maybe it's a guy thing, but it seems to involve too much commitment! Once you erase it -it's gone. (except for a lengthy history backtracking)
For most "erasing" I prefer to use a Layer Mask.
While on the active layer (the one you want to blend or "erase")
click on the Layer Mask icon (second from the left on your layers pallet, gray square w/circle). This will create an invisible mask over your image based on the background color currently selected. If you show WHITE as your default background, your mask will appear WHITE next to your image on the layers pallet.
The "magic" is, if you now paint with a BLACK brush while on your WHITE mask, your image will be "erased". In other words you won't see your image through the mask. It is still there, but your mask won't let you see it.
It really becomes a non-destructive erasing. And you can vary the opacity of the brush to better control how much you "erase". Or a better term would be "hide". Lowering the opacity toward the outer edges can help you BLEND your image very smoothly.
Here's the best part for me, you're not committed! If you find that you've gone too far, you can paint with the opposite color to get your image "un-masked". So if you painted with BLACK to hide your image, paint over again with WHITE (the same color as your Layer Mask) to return your image to view. You can vary that WHITE opacity too if you just want to bring a little of your image back into view.
Here's a screen shot of how the parakeet/cat photo was created.
![[image]](http://farm4.static.flickr.com/3450/3701325530_d855013d82.jpg)
If you look at the cat, Layer 2, you see the cat cutout and to the right of it is the layer mask (WHITE). Then you see a circle of BLACK that was painted on around the outer edges of the cat, in varying opacities. When you look at the big photo preview you can't see those area behind the black. You only see what I want you to see.
And that is the area in the center, the cat's face -which is still WHITE on the mask.
Using soft-edged brushes, of varying opacities on a Layer Mask can really help you Blend images from one photo to another.
In this photo, in order to make the cat appear "dreamy" (or nightmarish as some would argue!) I simply changed the BLEND MODE to Soft Light at 70% after completing the mask.
Start using a Layer Mask to blend instead of the Eraser tool. You'll gain much more control and better looking images too!


No comments:
Post a Comment