Sometimes, we know something is missing, but we just don't know what.
Photoshop is good at hiding stuff. Consider how many toolbar options there are. Consider how many sub-menu options are under each one of those. And how many drop-down box choices are even still under those. It's staggering!
But it gets worse.
Beyond what's on your desktop program, ready to use, Photoshop keeps a vast amount of options stored on your hard drive, (usually your C -drive) but not loaded onto your desktop version for immediate use. It stores all kinds of additional brushes, actions, filters etc. for use only when you need (and load them manually) into your current program.
The PUZZLE FILTER is a good example. You already have the capability to create a puzzle, but you probably never knew it. That's because it's one of those hidden (on your C-drive) files that you have to call up when you want it.
To create a puzzle from any photo, load your photo into Photoshop in the usual manner, then create a duplicate layer and name that layer PUZZLE.
Next, go to the FILTER menu and choose TEXTURE
Under that, choose TEXTURIZER
You'll now see a little drop-down box. Click the arrow and then click on LOAD TEXTURE
If it's your first time, you'll have to tell Photoshop where to find the file. Go to COMPUTER - C-Drive - PROGRAM FILES (or PROGRAM FILES (x86) and find PROGRAMS - ADOBE - PHOTOSHOP
Double click on the PHOTOSHOP file folder and look for a folder called PRESETS
Open that folder and look for PUZZLE.
Select the PUZZLE folder and click the button at the bottom marked LOAD
[You'll only have to go through this long procedure once.
Next time, you'll only need to click LOAD TEXTURE.]
Now, you'll see the dialog box you want to create your puzzle.
SCALE lets you determine HOW BIG the pieces are
RELIEF set the depth (or shadow darkness) of the piece edges
(You can also change the light direction and have an option to INVERT your choice)
That's it.
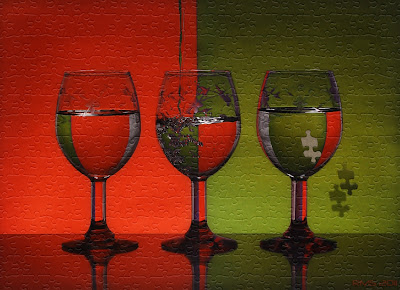
If you want to get fancy with a 3-D effect like the photo shown above. Create a new layer under your puzzle layer, and give that a cardboard color and a bit of texture or pattern to look realistic.
Then, go to your puzzle layer and cut out one or more pieces. You can use the pen tool for most accurate results, but I find the MAGNETIC LASSO tool works just fine for most things, if you remember to click often to set your points.
Once you have the selection complete, go to LAYER - NEW LAYER via CUT to remove this piece. Use the move tool to give it a new location and then give it some shadow to separate it from the photo for that 3-D effect.
==========================================
While this tip is not included in the Original Photoshop Recipe Book, you will find hundreds of other great Photoshop tips for users of all versions in my "PHOTOSHOP RECIPE CARDS" book.Why "LEARN" Photoshop...
just follow the recipes for great photos every time!
See why everyone's lovin' these
RECIPE CARD shortcuts...
Get your book today at: http://photoshoptipcards.com
===========================================


No comments:
Post a Comment