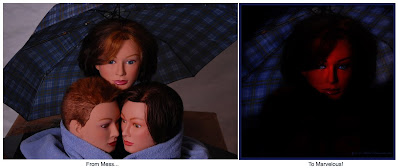
Click the Pic for a Bigger, Better Look!
Michelangelo, the famous Italian sculptor said, “I saw the angel in the marble and carved until I set him free.”
Perhaps as modern photographers we could find a similar expression in, "I saw the angel in the digital image file and Photoshop'd until I set her free." Not nearly as poetic as Michelangelo, but I think appropriate.
Here's just one more, I promise that will be all the culture for today...He also said, “Every block of stone has a statue inside it and it is the task of the sculptor to discover it.”
I think this is true of our photographs too. Using Photoshop as our chisel, we should be able to manipulate and form just about every image into something of beauty. After all, we must have seen something of beauty in the photo or else why would we have taken it in the first place? Just because we couldn't fully capture the maximum beauty with our camera and lights, doesn't mean the beauty's not there. We just need to work it a bit with our Photoshop tools.
With enough cropping, creative use of filter, brush, and adjustment layers we should be able to release the beauty.
I've attached a recent example that shows this. On the left above, is the mess I started with. I began shooting with only a vague concept of what I wanted. Actually, the theme was something blue. Blue umbrella, blue towel, blue eyes on the top center model.
After about 25 -30 shots of different poses and lighting, I really wasn't "feeling it" so I quit shooting for the night.
I opened the photos to preview and chose this one to Photoshop and began work to "reveal" the beauty trapped within.
Here are the steps and tools I used to go from mess to marvelous...
1. Heavy
Gaussian Blur to hide the table and white backgrounds, layer mask to un-blur the face and umbrella.
Not enough, so I went to....
2.
Filter - Render - Lighting Effects - Omni to center light on the top model and blacken out surroundings.
Good, but the skin tone of the mannequin is too flat, needs texture
3.
Filter - Distort - Ocean Ripple, not bad, but needs more texture still
4. On a copy of the original layer,
Filter - Distort - Glass, blend mode to overlay above the Ocean Ripple.
5. Looks good, but needs more intense colors, so on a copy of the Glass layer,
Filter - Blur - Gaussian Blur, mid range, then change the
blend mode to overlay so it doesn't blur - it just intensifies the color, and reduce to 50% opacity, to tone done the color just a bit.
6. Finally, a bit of playing around with different
crops, and...
7. a
50% gray adjustment layer to selectively darken and lighten areas
There were probably 5-10 other good photos I left in that image. I could release them with different cropping and PS tools centered on other areas, but the umbrella, the glass filters that give it a wet look, and her "blue" expression all seemed to work together for this image.
So don't be too quick to give up on your images because they're not exactly what you had hoped for when you held the camera. You've got a lot of power tools in Photoshop. Much easier than a hammer and chisel.
Release the beauty within! Turn your mess into marvelous!